Wednesday, December 7, 2011

Anime USA

Late AUSA post is super, super late. But it hit right around the time where I was doing a lot of traveling and then I needed to catch up with work. But here is my late AUSA con report.

The con center itself is a fairly decent looking hotel. Though its really too bad that the hotel is getting too small for the con. I went last year and I thought it was a bit crowded, this year was pretty bad. It's been a while since I've been in a con this crowded and this was probably one of the worse. Though I heard a rumor that the con moved to a new location for next year. The hotel itself was really rather nice. And the rooms were really massive, which I guess doesn't matter any more.

They were far more up on badge checks, near the escalator points, but I didn't notice any by the elevators. Maybe they weren't allowed to. But they had the typical ones right by the dealers and artist alley. Speaking of artist alley, I really rarely ever buy stuff from there but there was someone selling these adorable Tiger & Bunny plushies so I had to snag one up.
Photobucket
I got the small one in the front. But look how cute they are! Whoever the artist is, someone link me, I want to credit you.

The dealers room was alright, again, the layout was rather odd. It's almost sectioned off into two areas, and you have to weave your way around. I tend to like getting figures more then anything, so there was maybe a few booths (Anime Sekai being my favorite), but otherwise I didn't end up seeing a lot that I liked. Also on Friday they didn't open until 2pm, which made no sense to me. Most dealers rooms won't open up until around noon, but I don't understand at all why they waited until 2pm.

Unlike most cons I actually spent time going to a few of the panels. One of them was a beginners cosplay's panel, just to see what it was like. I felt rather bad for the people running it, because they had the poor luck of being next to the game room and they didn't have a mic. But otherwise it was a well run and presented panel.

Speaking of the game room...it was probably one of the worst game rooms I've seen. And it wasn't because of the content. The location was small, the room was near impossible to navigate through, and it had tons of people crammed in it. They needed a bigger room, hopefully next year they'll do that.

When it comes to cons, this con is more of "hangout with friends and take photos" con. In the area there isn't a lot (there is a CVS that sells booze) but other then that, once you walk around the hotel there isn't much. I wouldn't recommend coming from far away for this con, but if you live within the east coast I think this con is worth checking out. It's slowly growing into something bigger, so I'll be excited to see where they go next year.

And of course some photo highlights from the con.
Photobucket

Photobucket

Photobucket

Photobucket

And of course the rest can be found here. Enjoy!

Friday, November 4, 2011

Cosplay Progress

So it's been a while since I updated! For the most part I've been working to get ready for AUSA. I have several costumes finished, with small details that need to get done. Normally what I like to do is when I finish a costume, I like to do a page dedicated to each character. But with this update I'm going to include the progress for each one of the characters I worked on.

AUSA Line Up

I know. 5 costumes. How did this end up happening? The June costume isn't mine, but I'm borrowing from a friend (who was the June in the previous 999 group I was in). And Karina originally wasn't meant for AUSA but I managed to finish the costume early so I decided to bring her along as well. June I'm wearing with a few friends who are doing 999 cosplay, and Claudia is obviously already made.

That least Wakaba and FeMC left. It's sort of funny how the two has similar looks; hair pulled up, and dark jackets. FeMC I started working on first, and I had some slight fit issues.

I chose a pattern size that was a bit too big, so when I made it and tried it on, everything was much bigger then it should be. FemMCs jacket was a bit interesting, so I had to sort of pattern it from scratch, based off a tshirt pattern that had the same collar.


As you can see with the original fit, everything is far too long, to big/bulky. The bow was made from scraps of fabric that I had sitting around, probably the easiest to make. Now onto the refitting...

Photobucket

As you can see the fit is far better. The jacket sits where its supposed to, and the jacket isn't so long and baggy. There's also a different, better fitting blouse underneath. The stripes on the front are bias tape that's sewn on top of the jacket. And the closure for the jacket is an invisible zipper, most of which is hidden by the bias tape. Only thing left now is the socks and I'll be good to go!

Karina
This was probably my favorite to work on. The dress was super simple to make, it was just a basic dress pattern that I adjusted to fit what I needed. I ended up using Kona Cotton for the fabric, which made ma little nervous at first, but once it was lined, everything was perfect. The fabric is super soft and breathable, and Kona had the colors I needed.

Photobucket

The ruffles were all done by hand, which I really wouldn't recommend if you have a lot to do, because it's a really tedious process. But the end result was really nice. The triangle parts were all done by sewing individual pieces together, nothing complicated.

Photobucket

The vest has a bit of fuzz/sheep's fur in the collar. The wig was my first Taobao order, which was amazing. Probably one of the best wigs that I have right now. The arm parts have bits of elastic in them to create the poofed out look and holds to my arms better. Also the stockings are from sockdreams. I wish I would have started ordering from them sooner. I've never had a better order and faster shipping before.

Wakaba
This was a last minute choice because a friend of mine asked if I would cosplay from Utena with her. So I excitedly agreed. The jacket and pants were really simple. The pants I bought and adjusted. It was surprisingly difficult to find waist high, white pants that weren't denim.

Photobucket

The last bit was the jacket. The jacket was fairly easy to make, I found a pattern that fit really well and I adjusted from there. Thanks to the amount of bias I've had to sew, I've gotten pretty good at it. I havea friend working on her sword for me, and once I finish a few details, and the wig, I'll be all done!

Photobucket

The last thing I want to mention is my friend Electricbarbarella has a cosplay blog up now. I think you all should go and check her out!

Tuesday, September 13, 2011

Sissel Wig

I hadn't done an update in a bit, not since quickly recapping Otakon, I figure I can go into detail as to how the wig was made and the process I went into it. This was the first time I ever took on a project as big as this. Most of the wig stuff I've had to do were pretty minor. Even for my costume in this group I only had to trim the wig. But I wanted a group so as long as our Sissel paid for the supplies I would make the wig for him. I'll go into as much detail as I can on the process I went through for this wig.

Supplies
Bristol Paper
Tape
Plaster
Paint
2 Blond Wigs
Wig Heads
Spray Mount
Mod Podge
Wig Combs

The first step was building the base. The base was the Bristol Paper, which is basically a thicker stock of paper. It's a few pieces tapped together. The bottom part is one piece, and then to get the strange, curled up shape that's several pieces stacked and tapped on top. It's a bit hard to explain, but you basically want to make a cone shape. When you build up as much as you can on the base so you have more for the hair to stick to. The tape is black but we don't have to worry about that, all of that stuff will be covered.

Once I got the shape that I wanted, I took strips of plaster and covered it. You want to be careful not to use too much, because you don't want to make it too heavy, it will be resting on the top of the head. I just wanted it wrapped up so it could cover the tape. You really don't need to worry about sanding it or anything, since it'll be covered.


Once it was plastered, matched a paint to the hair as close as I could and painted it. This is just in case any sort of stray hair opens up and the base is shown. It basically helps everything look nice and consistent. Once the base was dried, I could begin the progress of fitting it to the wig.


When you're fitting the base of the wig to the head, you want to make sure you have a way of securing it. I ended up hot gluing it to the top of the wig, so it would hold there while I could work the hair along the base. This is a bit more complicated to explain, but I'll through the process I went to attach the hair to the base.

First thing I did was take a clump of hair and spray it down with hair spray to make it stiff. Then taking the spray mount, I would spray it onto the base and then press the hair to it. Taking a brush, I would paint the mod podge along the hair to help make it more stiff, as well as stick it to base better. I would repeat this process until the base was completely covered in hair. In the end it looked something like this...

2011-06-22_00-13-46_499.jpg

Not...incredibly nice. But it will look better! This is where the second wig came into play. I harvested the second wig for wefts and attached the wefts in the same way I attached the hair from the wig.

I didn't really do much differently from the last part. The ends of the hair was painted with mod podge to make them stiff, so I could create a hairline for the wig.

2011-07-02_23-42-42_467.jpg

Slowly but surely the wig was starting to look more even, less like a mess of hair around the base.

2011-06-22_23-40-26_119.jpg

And the final result was this!

Photobucket
Worn by Hayabusa72.

This was probably the biggest wig project ever. It was tough...but I was glad for the experience.

Wednesday, August 24, 2011

Otakon and Post con updates

Wow, so it's been nearly a month since I updated. Normally what I do is write up a quick con report after a convention, but this year things were a bit unsual. I didn't get to go to Otakon for the full weekend like I planned. I had the chance to spend a week in Mexico, so I took that and spent only a day at Otakon. I was happy for the day that I got to spend there, it was so much fun. I can't really write too much about the con itself. Most of my time was spent catching up with my friends.

Otakon was SUPER hot. I mean hotter then any year I've ever been to. Even in the super light costume I was wearing, I felt like death standing outside for the few moments from when I had to go between hotel to con center. I felt bad for anyone in thick or massive costumes, you guys are all champs for making it through. Every year feels like more and more people are going.

My cosplay for the con...I went as Kamila from Ghost Trick.
Photobucket

I had a wonderful, fantastic group with me. Everyone did such a fantastic job on their costumes.
Photobucket

Photobucket
Jowd, Lynne & Sissile.

And of course I'm going to post some of the highlights from Friday that I snapped.
Photobucket

Photobucket

Photobucket

Photobucket

And of course, the rest of my photos are here.

It looks like I'll be making it to AUSA again this year, which I'm excited about. I've got two new cosplays in the works, so I best be working on them.

Tuesday, July 12, 2011

Connecticon 2011

Photobucket

Connecticut Convention Center; Hartford, CT
July 8-10th
Website

This was another one of those conventions where I was surprised at the last moment that I could go (literally, I found out 2 days before the con I could make it). I've heard of the con before but never really experienced it until now. The con itself is one of those big mix cons, it's not just anime, but video-games, sci-fi and everything else. They do a pretty good job of mixing everything, and there was a ton of different people. If I had to compare the size it reminds me of Ohayocon.

This was one of the few times I actually got the chance to really check out the panels, and I'm glad I got to. About all the panels I went to were really great. One of the more different panels I went to was the Parkour panel (which a lot of Assassin Creed cosplayers showed up to, no surprise there). While not really fitting too much into the whole con, it was an interesting panel to go to, to hear about what Parkour was really about.

Out of the main events, I saw the Dating Game, Masquerade and the Death Match (also a very small bit of the chess game). What I want to start off with, and what I didn't know, is that a lot of these have these main skits that the people running them do. I don't think the idea is bad, but they ran WAY too long. The best example is the Masquerade. It was supposed to end at 10:00pm so the Geek Comedy could begin. We left by 11:00pm and they were still doing their skits. The Dating Game was run the same way, everything was pre-decided and was just made to be a skit. Which is fine, if that's what they want to do. But something like this shouldn't be done for the Masquerade. The Masq is for the people who entered, who made costumes and skits for it. It really shouldn't be overrun by the people running it. The skits ran on FAR too long. I think if they need to do something like that, they need to make sure they run far shorter, they'd be far more enjoyable.

But moving on, I caught the end of most of the skits, and they looked pretty good. They placed the winning AMVs at the end and ALL of them were amazing. My favorite was "Captain Jack Sparrow" one...I wish I could find it online just to post. The Death Match was amazing. The MC was great and I loved to be able to cheer for the characters I wanted to win. I sadly didn't get to see the end of that, but I think the events where the audience can participate are the best.

The dealers room was pretty fantastic. Lots of space and a lot of really good booths. There was one in particular though that was selling nothing but knock off figures. The prices were super tempting, extremely low, but every single figure there was a knock off. I know some people don't really care either way, I'm particular about the figures I buy. If I'm buying a figure I want it to be authentic. But my favorite booth Anime Seikai was there. If you're going to buy a figure Anime Seikai is the best place to do it. They have a ton of figures, all authentic and range in pretty decent prices. I love seeing their booth at cons because they always have new figures. (Okay I think I've pumped up Anime Seikai enough). Another great thing was the Artist Alley set up. The room was pretty big and there was a lot of different types of artists there.

I really loved the layout of the whole convention. There was a lot of space, and it was pretty easy to get from one place to another. I think it worked out well because the amount of people there. I have a feeling once the convention gets larger this will be more difficult to fit everyone, that's pretty normal for any con. But the size and the center was perfect. I had a really good time overall, I would definitely come back to this con.

Photos
Photobucket

Photobucket

Photobucket

Photobucket

And of course the rest of the photos are here. Enjoy!

Thursday, June 23, 2011

Claudia Auditore

I'm pretty much basically finished with Claudia, enough to take as test run, there's a few details I need to fix up a bit but I thought I'd show you all the test run I did. So I thought I could break it down a bit more then I did in my previous post where I spoke more about the progress.

I wanted to cosplay Claudia after I saw her in Brotherhood, she was fine in AC2 but she became SO much better in Brotherhood. I was a bit anxious to start on that dress that she wears, I really never made anything like that before. But then I saw her new outfit near the end of the game...and fell in love. She got really bad ass and started fighting alongside her brother at the end sequence. I think I loved her character as soon as she stabbed those guards early one and took on a brothel herself just to help the brotherhood.

What was interesting about this outfit is how it was based off of Maria Thorpe's outfit from Bloodlines and the end of AC2.
Photobucket


Pretty interesting, just a few minor changes, obviously the color, choice of fabrics and the boots are pretty different. But overall the design is still the same and references her outfit.

The first part was her tunic. The tunic was based off of dress pattern I had laying around, the same dress pattern I used for Trucy. The pattern had to be modified a bit, because the top part was separate from the bottom, but it had the same panels I needed for her tunic. The panels go between a brocade and a satin. And in between there's bias made from the satin.

The front was probably supposed to come together with hooks or latches, but I went with ease for myself, not entierly period accurate but I'm wearing a cape so that little detail wouldn't be noticed. I added a zipper in the back and the front is sewn together with a ladder stitch, to give it that look that her tunic had. The inside is lined with a super light lining material. It's pretty near sheer, but the point was to keep the brocade from fraying. The brocade frays SO easily, I sort of wish I had fray check to keep it from being so annoying. I did end up using a zigzag stitch on my machine to help it, but it goes to show that a serger would really help. But you make do with what you have! And a zigzag stitch is a decent substitute if you can't afford a serger.

The shirt part was based of a blouse pattern I had laying around, but it's not a full blouse. I made it enough to where it met the tunic and then sewed them together. I mostly did it to avoid the amount of layers I had to wear, because I knew how hot I'd be in the costume. There's still the cape I had to wear.

The cape itself was drafted from my own patterns. I had a hood pattern laying around that I modified and used, the caplet parts were part drafted on my own and the rest I found something I could modify. I lucked out and had JUST enough fabric to make the actual cape part and line it. That wasn't too difficult, the difficult part was to use the bias around the caplets.

Bias itself is never too bad, it's the corners that can get you. I had never sew corners before.I found this amazing tutorial online on how to do it, and it really helped out a lot. What is missing and what I still haven't done is the design she has painted on the back of her cape. I still really need to get around to doing that.

The rest are bought. I was able to use my own hair for her since she just has it pulled back. The boots, bracers and belt are all bought and thanks to a friend I had a small knife to carry!

Finished
Photobucket

Photobucket

Photobucket
Also thanks to this Ezio for posing with me! He was fantastic.

With the finished photos from the test run I really need to fix up a few minor details. But overall I'm pretty happy with how it turned out and I'm even more excited to wear it to Otakon!

Monday, June 13, 2011

AnimeNEXT

Photobucket
AnimeNEXT
Garden State Exhibit Center Somerset, New Jersey
June 10-12

This was my first time going to AnimeNEXT, but it wasn't far away and for the price it was a really great opportunity. The con itself was split between three buildings, which isn't too unusual for some cons, some can split between several buildings near the same complex. They aren't too far away from each other, two of the buildings are connected. But the third building was across the street, with no real crosswalk to get there. So there was people watching the street and running across. It was really dangerous, as far as I know there wasn't really any other way to cross. I never have a problem with walking around the convention center or even having it spread out, but it was really too dangerous to have it across the street like that. There had to be a better way to do that, or another room within the two hotels that were there. The hotel I stayed in was just next door (across a bridge) would have been a much safer choice.

The only thing to see across the street was the game-room, which sadly was a nice game-room. Not as big as Magfest (though I doubt many other cons I'll go to will have a gameroom that big or nice) but it was good for an anime convention.
Photobucket
All very important rules.

Other then that I really didn't mind the layout. This con really had some amazing places to take photos. Right outside the doubletree was probably the best. There was this nice little bridge and outdoor area, as well as a walkway between the two hotels. The weather was a bit of touch and go. It rained on Saturday a bit, a sort bit in the middle of the day and right around the end, but not really bad enough to affect any gatherings or cosplays from what I could tell.

The dealers room was really nice and expansive, there was a ton of stuff there, but not a lot of my favorite booths sadly. But there was a lot of options for others. This was probably the first con I didn't get a figure.

The con had a rather large stage area for some of the musical guests they had (that doesn't really fit what I tend to like at a con but it was really nice and massive for the people who wanted to see that. While you're walking into the dealers room you could peak in and see. What I really liked was how nice and seperated the Artist Alley was from the Dealer's Room. They had their own space to sell their work, and they were able to keep it open longer for people who wanted to buy things from them. I tend to prefer them separate like that, there's less crowding and people in the dealers room when they're shopping tend to shop for two different things. I always like to think it's at least two different mind sets, and the prices work much differently.

They had a small food area, that sold pizza, sandwiches, all that good stuff, and it was so nice to have in the con center. The food was a bit pricy, between $5-6 for just one sandwich but that really can't be helped, the hotel will charge more. My one real complaint is that they were cash only, it would have been much easier if their machines took credit cards. There was a few ATMs around though for people to pull cash.

Overall it's a fairly smaller con. It's not utterly massive like Otakon would be, it's smaller but there was plenty of people around. It seems to be one of those cons that are just getting bigger with every year, which is probably why they have such an awkward spacing issue. I think this con is fantastic if you have a group of friends that you want to hang out with and get lots of really nice photos. None of the panels were really terribly interesting to me to check out, but I'm not exactly the person to ask about panels. But I adored the outdoor locations and taking photos and exploring the dealers room. I would go again next year, definitely.

Photo Highlights
Photobucket

Photobucket

Photobucket

Photobucket

Photobucket

Photobucket

And the rest of the photos are here. Don't forget to check out the subfolders!

Saturday, June 4, 2011

Remaking: Ukraine

I originally made Ukraine in 2009. It was an early costume and it was the first time I ever made pants. That was an adventure in itself. I really only got to wear the costume to one con before I ripped them taking them off. This time I've learned from my mistakes and was ready to remake and re-wear this costume.

Photobucket
Old version.

The previous pair were really flimsy. I chose a really cheep thin material, and then I decided not to line it. So not only was it thing and flimsy, but it ripped easily because of that. The pants were too low, sitting on my hips when I needed it closer to my waste. Though at the time, there was only a few images of the character, so it wasn't terribly inaccurate. Now that more images and material have come out, I can make it a bit more accurate.

Photobucket
New version. My room has changed. Slightly.

The pants were really the only part I remade. The rest was still pretty alright to keep (though if I really wanted to, there's some minor stuff I could fix with the blouse, but it's pretty fine for now). So I chose a much better material, something with a slight stretch to it, for movement. The color is also slightly different. It's not as saturated as before, but I'm much more pleased with this color then before. I actually thought to make them baggy enough and long enough, I used a different pattern and I'm glad I did. Before the pants were near skin tight, and they hit just at the knee. With the new ones they are able to tuck under my boots like they're supposed to. I also added lining, and the thickness was worth it for the pants.

Sadly I still don't have a prop like I'd like to. Maybe another time I can!

Also I found out that I got a chance to go to AnimeNEXT. So I should have photos and a con report of that as well!

Also for sake of self promotion, I have Honekoneko plushes for sale on Etsy. You should go and buy one.

Saturday, May 28, 2011

My Process

Haven't posted in a while, but I haven't had a costume I'm working on. I'm pretty much ready for Otakon and just been making plushies over at my other blog.

Even though it's early I like to think of the next thing I want to cosplay. I tend to like to pick something out early so I can plan ahead for it. So for this post I'll go through my process and how I plan and start making a costume. For this example, I'm going through what I did when I cosplayed
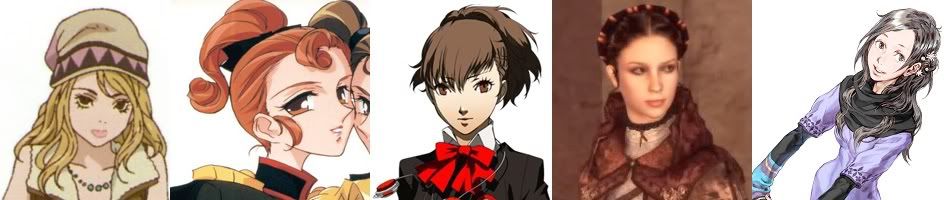
 Clover from 999.

Decision
The first and most obvious thing is to pick what character you want to cosplay. Shouldn't be difficult, right? It can be if you're one of those people (like myself) who have a million things they want to cosplay. Narrowing it down comes down to a few factors; skill, money, and if there's anyone else who wants to cosplay with me. Not that I need a group to cosplay but sometimes a group can make it more fun. In this case I had several people who wanted to cosplay from the game with me, and I had plenty of time to make it, so I decided on Clover.

References
A very important part in making the costume, I need good references so I can get it as accurate as possible. It's good to try and collect as much as you can, the more the better, that way it's easier to make the costume. 999 has a small fandom but a really dedicated one, so I had a few good references to go off of, for colors, shapes, etc.
Photobucket
Photobucket
I had a lot of really decent references to go off of, so I knew how everything was supposed to look. Sometimes you might have the issue of color variation, like between the illustration and the height chart they show there. The top image is more true to the in-game, so I tried to base everything more off that. Which meant her sweatshirt was baggier, a bit looser fitting, and the colors were brighter. Though for my wig, it ended up being closer in color to the illustration.

Fabric/Patterns
I try and hunt for patterns first before I worry about getting fabric. It's always nice to have the extra fabric, but if you can't afford it, it's better to know how much you actually need. Most of my patterns I get online from sewingpatterns.com. It's great because you can download and print what parts you need and it's super cheep to download it. Another option is to wait until Joannes (or any local fabric store) has a sale. Joannes has a ton of amazing coupons and they have $1 pattern sales.
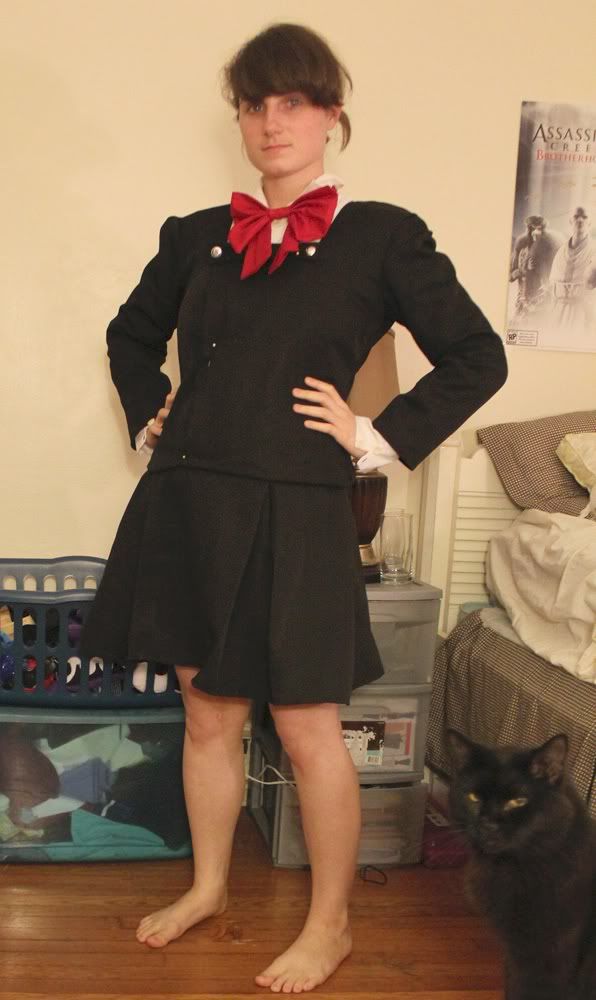
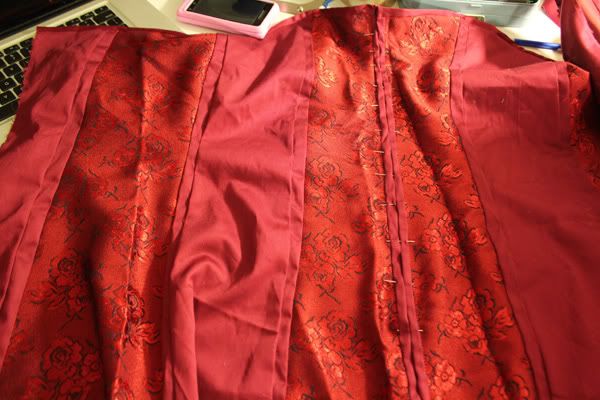
For Clover I used Butterick 5285 for the skirt and shortened it to match the length I needed. And for the sweatshirt I used See&Sew B4331, though sadly I got a size too big, and had to size it down a bit. The slight oversize I had ended up working out in the end because I needed it to be a bit baggy.
The leggings I ended up patterning myself, it's a basic sort of triangle shape and then the bottom part has elastic in it so I can stick the boot through and get the right shape that she has. I looked up some stuff online for the right shape, you can find a lot of free patterns online if you search.

Wig
Most of my wigs I get through ebay. A lot of Chinese sellers have wigs for cheep and don't have shipping, but they take a long time to ship. There are plenty of decent US companies who sell wigs targeted towards cosplays, like Arda-Wigs. It all depends on what you need. For Clover I found a curly burgundy wig on ebay.
Styling all depends on your character. For Clover I needed a fluffy pigtailed look, luckily I had this tutorial I could base it off of:
Poofing Pigtails
Photobucket
And then the near final result, before I trimmed the bangs.

Wig styling is a tricky thing, because if you mess up it can sometimes be irreversible. You just have to experiment, that's the only way you can get better at it. I can't really claim to be an expert, I've only really had to do minor trimming and styling, but it's the best advice I can give. Try and get yourself some decent tools. Get yourself a pair of scissors that you'll only use to cut wigs for. And also a pair of thinning sheers, which will allow the cuts to look less blunt and more natural.
As for when I get the wig, I try and order it as soon as I want to do the character, so sometimes it could come before I start sewing and sometimes it comes after. I can't say when's the best time to start working on the wig, I guess the best is when you feel comfortable doing it.

Sewing
I guess most of this is sort of covered in the fabric part, but the actual sewing part is sort of a big thing in making a costume. Getting yourself a decent sewing machine is a plus. For basics you need a machine that has several stitching functions. It's really helpful if you can get a serger, so you can hem everything. But they are expensive. A cheaper alternative is to get a machine with a zigzag stitch. It doesn't completely replace a serger but it's a decent alternative. Also a good thing to keep at your side is fray check, to keep the fabric from fraying too much.
For Clover, I used my Janome machine. It has several stitch functions, enough so I could make it completely, use my zigzag, and if needed to, create button holes. A lot of really decent machines you can buy refurbished.

Buying
This is the last section I'll include in making everything. Because there's a good number of things I can't really make on my own, like shoes. Again, like the wig, most of the stuff I buy is on ebay. I like using ebay because most everything you can get is a lot cheaper then anywhere else. The blouse was a bought item as well, because it's so basic, it's an item that you sort of just want to own for multiple cosplays or outfits. Sometimes it's good to have basics because they can be reused.

That's about my whole process right there. Whenever you finish make sure you take a lot of photos of your completed it!
Photobucket